
Pumpkin Biscoff Cheesecake
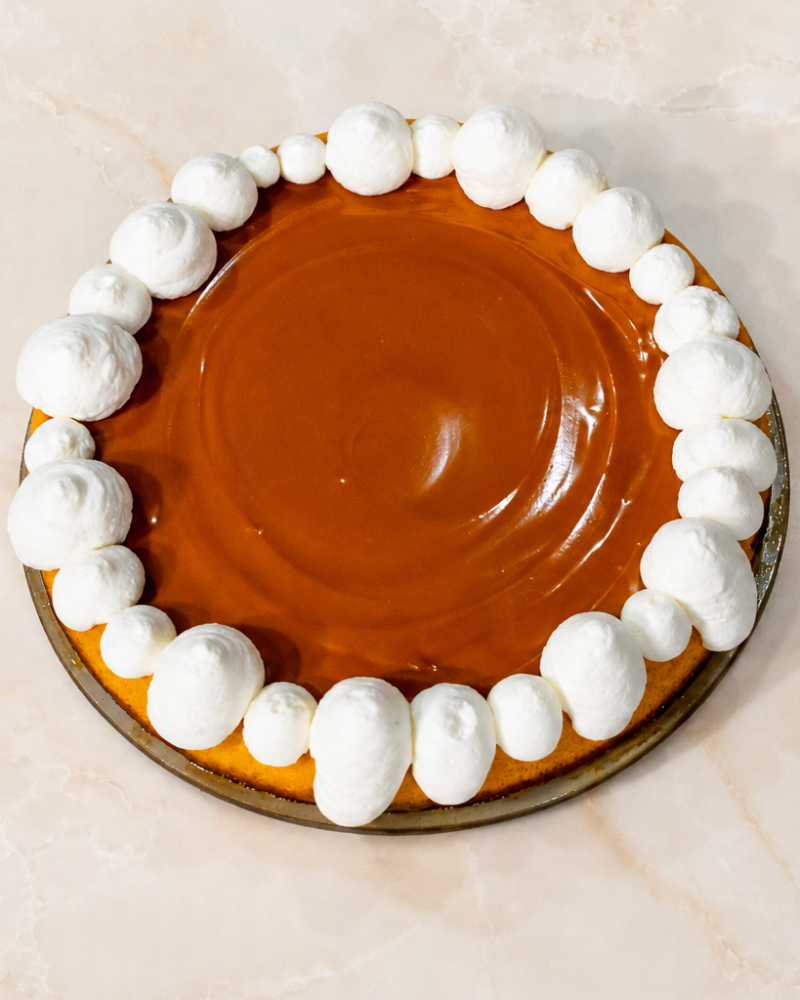
A creamy, lightly spiced pumpkin cheesecake meets the warm, caramelized flavor of Biscoff cookies in this delicious twist on a Thanksgiving classic. Featuring a buttery Biscoff cookie crust, silky pumpkin filling, and a smooth cookie butter topping, this dessert is an elegant addition to any holiday table.
PREP TIME: 20 minutes
COOK TIME: 35 minutes
LEVEL: Easy
YIELD: One 9-inch cheesecake | 8 servings
Ingredients
Biscoff Cookie Crust
- 150 g Biscoff cookies, finely crushed (approximately 1½ cups crumbs)
- 55 g unsalted butter, melted (approximately 4 tablespoons)
- ¼ teaspoon fine salt
Pumpkin Cheesecake Filling
- 8 oz (227 g) full-fat cream cheese, softened
- ¾ cup (180 g) pure pumpkin purée
- ¼ cup (60 g) sour cream
- ½ cup (100 g) granulated sugar
- 2 large eggs
- 1 tablespoon (8 g) cornstarch
- 1 teaspoon vanilla extract
- 1½ teaspoons (3 g) pumpkin pie spice
- ¼ teaspoon fine salt
Biscoff Cookie Butter Topping
- ½ cup (120 g) Biscoff cookie butter
Optional Garnish
- Freshly whipped cream
- Crushed Biscoff cookies
Method of Preparation
Prepare the Biscoff Crust
- Place the Biscoff cookies in a food processor and pulse until finely ground.
- Combine the cookie crumbs with the melted butter and salt, mixing until evenly moistened.
- Press firmly into an even layer across the bottom of a 9-inch springform pan or pie dish.
- Refrigerate while preparing the filling.
Prepare the Pumpkin Cheesecake Filling
- In a mixing bowl, beat the softened cream cheese and granulated sugar until smooth and creamy.
- Add the pumpkin purée, sour cream, vanilla extract, pumpkin pie spice, and salt. Mix until fully incorporated.
- Sift in the cornstarch and mix until smooth.
- Add the eggs one at a time, mixing on low speed just until incorporated. Avoid overmixing.
- Pour the filling over the prepared crust and smooth the surface with a spatula.
Bake in the Wolf Speed Oven
- Place the cheesecake on the lower turntable riser in Wolf Speed Oven. Use cookware approved for combination microwave/convection cooking.
- Select Micro Bake at 300°F. No preheating is required.
- Bake for approximately 35 minutes, checking for doneness a few minutes before the end of the cooking time.
- The cheesecake is ready when the edges are set and the center retains a slight jiggle.
- Carefully remove the cheesecake from the oven.
Alternative Cooking Method Using a Wolf Convection Oven:
For a traditional baking method, this cheesecake can also be prepared in a Wolf Convection Oven using Bake mode and a water bath to encourage gentle, even cooking.
- Preheat the Wolf Convection Oven to 300°F on Bake mode.
- Prepare the cheesecake in a 9-inch oven-safe springform pan or pie dish.
- Place the cheesecake pan inside a larger roasting pan. If using a springform pan, protect the bottom and sides from water intrusion with a suitable waterproof barrier.
- Carefully pour hot water into the roasting pan until it reaches approximately halfway up the depth of the cheesecake filling.
- Place in the preheated oven. Begin checking for doneness after 30 minutes, continuing to bake until the edges are set and the center retains a slight jiggle.
- Remove the cheesecake from the water bath and allow it to cool for 10–15 minutes before refrigerating until completely chilled.
- Finish with the Biscoff cookie butter topping and garnish as directed below.
Cool and Refrigerate
- Allow the cheesecake to rest at room temperature for 10–15 minutes.
- Transfer to the refrigerator and chill until completely cooled and set.
- Once chilled, carefully remove the springform ring, if using.
Prepare the Biscoff Cookie Butter Topping
- Place the Biscoff cookie butter in a microwave-safe bowl.
- Using the Wolf Speed Oven’s Microwave mode, heat in 10–15-second intervals, stirring between each interval, until smooth and pourable.
- Allow the cookie butter to cool slightly.
- Pour over the chilled cheesecake and spread into an even layer.
- Refrigerate briefly until the topping is set.
Garnish and Serve
Pipe freshly whipped cream around the perimeter of the cheesecake and finish with a light sprinkling of crushed Biscoff cookies, if desired. Slice and serve chilled.
Chef’s Tips
- The Perfect Cheesecake Texture: For a smooth, creamy cheesecake, avoid overmixing the eggs and remove the cheesecake when the center still has a slight jiggle. It will continue to set as it cools.
- Choosing Your Bakeware: A 9-inch springform pan creates a beautiful presentation and allows for easy unmolding. A standard 9-inch pie dish also works well and can be used to serve the cheesecake directly from the dish. For Micro Bake, use cookware approved for both microwave and conventional oven cooking.
- Why Micro Bake? By combining convection heat with microwave energy, the Wolf Speed Oven allows this cheesecake to bake without preheating or preparing a traditional water bath, simplifying the process while delivering a creamy finished texture.
- Make It Ahead: Prepare the cheesecake the day before your gathering and keep refrigerated until ready to serve. It can also be prepared and served the same day.
- Storage: Keep covered and refrigerated for up to 3–4 days.

